Finished searching the main parts!
- Session
- 2 of 33
- Date
- 23 April 2026
- Time worked
- 2 h 15 min
- Reading time
- 3 min
- Images
- 2
First of all, I searched for a raspberry pi. I decided to use the Raspberry Pi Zero 2 W because it is smaller than a Pi 4, but still powerful enough, has enough pins for sensors, FC, cameras etc., and is not too expensive.
I checked the official resellers for the Pi Zero 2 W and unfortunately only FUNK 24 Aachen had it in stock. All other shops were sold out, so I ended up with a price of about 23€, which is still good.
Next, I wanted to add cameras for automatic landing with April-tags, and another one for controlling the drone over the internet (video stream) or later object detection. But I wasn’t sure if it would be possible to connect 2 cameras to the Raspberry Pi Zero 2 W and if that would be too expensive
So I searched a bit and found out that there are devices from ArduCam that can connect 2 or more cameras and connect them into one camera interface (Raspberry Pi Multi Camera Adapter)
Then I searched for the cameras. One thing that shocked me was the price (around 20–30€ per camera), but luckily AliExpress helped :)
But then I had another decision/problem: there were multiple camera angle options (77° / 130° / 160° / 200°)
After checking some examples and thinking about the recognision of the tags, I came up with this:
- the camera for landing needs a wide enough view to detect AprilTags even if the drone is not perfectly aligned
- 77° is too narrow,
- 160° / 200° are too large, which makes picture curve -> detection harder
- 130° is the sweet spot!
So I decided on 130° cameras
Then I moved to the connection problem. I wanted 2 cameras, but the Raspberry Pi Zero 2 W only has one CSI camera input.
So again I searched and found the ArduCam Multi Camera Adapter (V2.2), which allows multiple cameras on one Pi. But it was quite expensive (around 40–50€), and even on AliExpress it was still expensive and not really worth it for my budget.
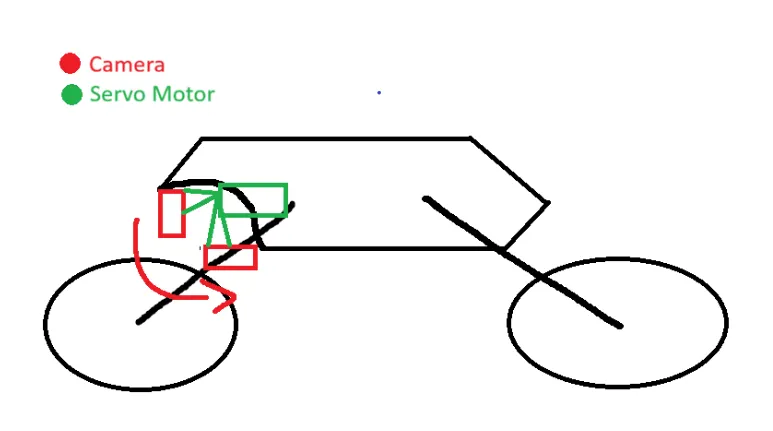
At this point I thought about another solution: instead of using 2 cameras, I could just use one camera and move it with a servo motor (tilt up/down). That would be lighter and cheaper:
- Servo weight: ~6g
- Camera weight: ~10g
- Servo cost: basically 0€ (I already have one)
So I decided to go with the servo solution instead of the multi-camera adapter, even though 2 cameras would be nicer. But it just didn’t make sense...
Here is an example of how the servo camera setup would work:
Additionally, I wanted to use distance sensors for more stable, controlled and safe flight (especially for landing without crashing).
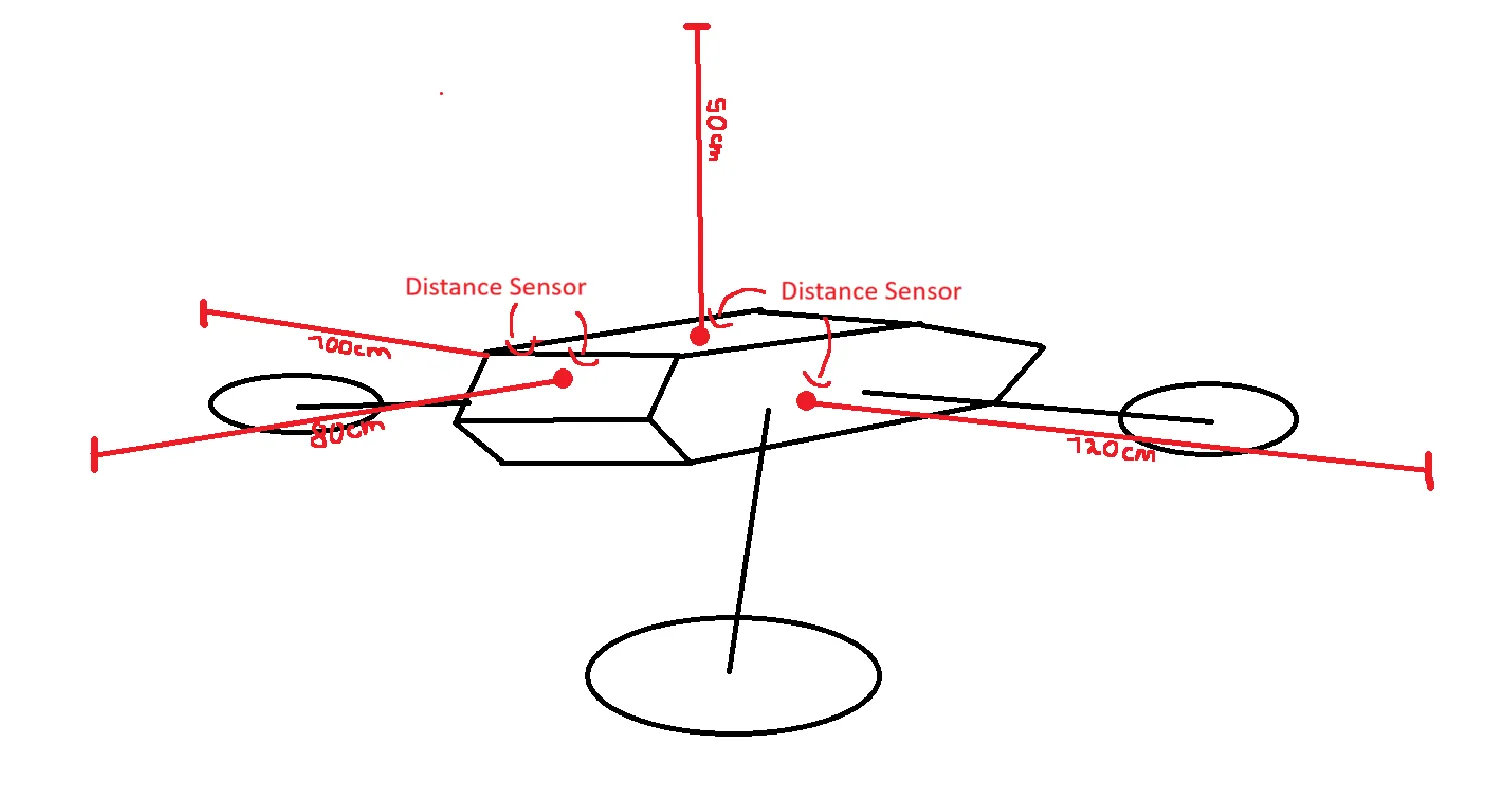
The idea was to measure distance on the left/right side and front/ground side.
Here is a small drawing of the sensor placement:
While researching, I learned that there are a few common sensor types:
- ultrasonic distance sensors
- ToF (Time of Flight) sensors
- IR distance sensors
- (and a few others)
After comparing pros and cons, I decided to use the VL53L0X ToF sensor, because:
- it is accurate for short distances (under ~2 meters)
- it is small and light
- it is cheap (~3€ on AliExpress)
Now I have found all the main parts I need for the project, including good prices, availability, and shipping time.
Happy with this sessions progress. I learned a lot again. Next session will probably be PCB design!!! Yippee!!
Session recordings
Timelapse recordings of this session.